Step-by-Step Guide to Integrating Custom Woocommerce Payment Gateways with WooCommerce Checkout Blocks
“Gutenberg Blocked Checkout or Checkout blocks” is a new feature in WooCommerce, starting from version 6.9, which was released in September 2022. Starting with WooCommerce version 8.3, the Woocommerce Cart and Checkout Blocks are the default for new installations.
WooCommerce Checkout Blocks represent a modern approach to designing and customizing the woocommerce checkout pages in a WordPress online store. In contrast to the traditional or “classic” checkout, This involves a series of steps where customers enter their billing details and shipping information, choose a payment method, and complete the purchase. The Woocommerce Checkout Blocks interface is designed to be user-friendly, enabling users to manage each element of the checkout page as an individual block, promoting a more modern and efficient e-commerce checkout process.
If you want to know how the Woocommerce Checkout Block Processes an order click here
If you want more details about how to create a new custom Woocommerce Payment Gateway with Woocommerce Checkout Blocks support – click here
To make woocommerce checkout blocks more user-friendly, it’s essential to provide a brief description or guide on how to make your custom woocommerce checkout payment gateway compatible with this new checkout system.
Step 1: Declare the plugin support WooCommerce Checkout Blocks.
Users can now experience enhanced convenience and efficiency during the checkout phase with the declared plugin. Add this to the plugin’s main file.
/**
 * Custom function to declare compatibility with cart_checkout_blocks feature
*/
function declare_cart_checkout_blocks_compatibility() {
    // Check if the required class exists
    if (class_exists('\Automattic\WooCommerce\Utilities\FeaturesUtil')) {
        // Declare compatibility for 'cart_checkout_blocks'
        \Automattic\WooCommerce\Utilities\FeaturesUtil::declare_compatibility('cart_checkout_blocks', __FILE__, true);
    }
}
// Hook the custom function to the 'before_woocommerce_init' action
add_action('before_woocommerce_init', 'declare_cart_checkout_blocks_compatibility');
Step 2: Register WooCommerce Checkout Blocks payment method type registration.
To register the WooCommerce Checkout Blocks payment method type, initiate the registration process to efficiently integrate it with the platform. This ensures compatibility and accessibility for users seeking diverse woocommerce checkout payment options within the WooCommerce ecosystem.
// Hook the custom function to the 'woocommerce_blocks_loaded' action
add_action( 'woocommerce_blocks_loaded', 'oawoo_register_order_approval_payment_method_type' );

/**
 * Custom function to register a payment method type

 */
function oawoo_register_order_approval_payment_method_type() {
    // Check if the required class exists
    if ( ! class_exists( 'Automattic\WooCommerce\Blocks\Payments\Integrations\AbstractPaymentMethodType' ) ) {
        return;
    }

    // Include the custom Blocks Checkout class
	require_once plugin_dir_path(__FILE__) . 'includes/class-phonepe-woocommerce-block-checkout.php';

    // Hook the registration function to the 'woocommerce_blocks_payment_method_type_registration' action
    add_action(
        'woocommerce_blocks_payment_method_type_registration',
        function( Automattic\WooCommerce\Blocks\Payments\PaymentMethodRegistry $payment_method_registry ) {
            // Register an instance of WC_Phonepe_Blocks
            $payment_method_registry->register( new WC_Phonepe_Blocks );
        }
    );
}
Step 3: Create a checkout block-based payment gateway class
Develop a woocommerce checkout blocks-based payment gateway class to facilitate seamless integration and interaction with modern block-based systems. This class enables efficient management and processing of payments within the context of evolving woocommerce checkout block-based technologies.
class-phonepe-woocommerce-block-checkout.php
use Automattic\WooCommerce\Blocks\Payments\Integrations\AbstractPaymentMethodType;

final class WC_Phonepe_Blocks extends AbstractPaymentMethodType {

	private $gateway;
	protected $name = 'sg-phonepe';// your payment gateway name

	public function initialize() {
		$this->settings = get_option( 'woocommerce_sg-phonepe_settings', [] );
		$this->gateway = new WC_PhonePe_Gateway();
	}

	public function is_active() {
		return $this->gateway->is_available();
	}

	public function get_payment_method_script_handles() {

		wp_register_script(
			'wc-phonepe-blocks-integration',
            plugin_dir_url(__FILE__) . 'block/checkout.js',
			[
				'wc-blocks-registry',
				'wc-settings',
				'wp-element',
				'wp-html-entities',
				'wp-i18n',
			],
			null,
			true
		);
		if( function_exists( 'wp_set_script_translations' ) ) {
			wp_set_script_translations( 'wc-phonepe-blocks-integration', 'wc-phonepe', SGPPY_PLUGIN_PATH. 'languages/' );

		}
		return [ 'wc-phonepe-blocks-integration' ];
	}

	public function get_payment_method_data() {
		return [
			'title' => $this->gateway->title,
			'description' => $this->gateway->description,
		];
	}

}
Step 4: Create js files for the block.
Generate JavaScript files for the checkout block to implement and enhance its functionality within the designated application. These files encapsulate the necessary code and logic required to empower the checkout block’s dynamic behavior and user interactions.
checkout.js
const settings = window.wc.wcSettings.getSetting( 'sg-phonepe_data', {} );
const label = window.wp.htmlEntities.decodeEntities( settings.title ) || window.wp.i18n.__( 'Phonepe', 'wc-phonepe' );
const Content = () => {
	return window.wp.htmlEntities.decodeEntities( settings.description || '' );
};
const Block_Gateway = {
	name: 'sg-phonepe',
	label: label,
	content: Object( window.wp.element.createElement )( Content, null ),
	edit: Object( window.wp.element.createElement )( Content, null ),
	canMakePayment: () => true,
	ariaLabel: label,
	supports: {
		features: settings.supports,
	},
};
window.wc.wcBlocksRegistry.registerPaymentMethod( Block_Gateway );
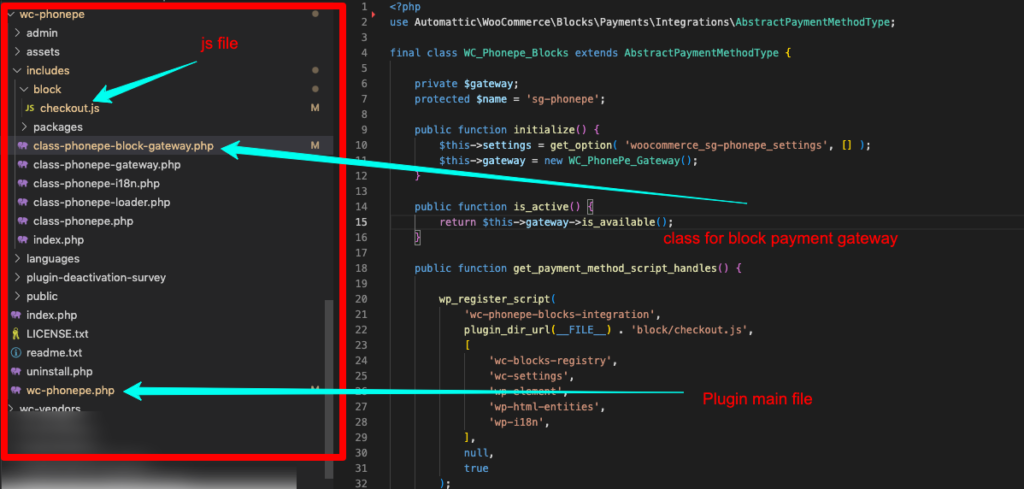
Example folder structure based on Boilerplate.
Facing any difficulties to Integrating Custom Woocommerce Payment Gateways with WooCommerce Checkout Blocks please comment on this post so we can help you.
In this article, I’ll share our order approval plugin for Woocommerce websites, starting with our order approval for woocommerce plugin with a blocked checkout mechanism.
If you’re interested in a WooCommerce WhatsApp plugin with support for WooCommerce checkout blocks, take a look now!
Require assistance developing a custom WooCommerce payment plugin? Let’s chat and create a specialized solution for your needs.
Hello,
I want to show credit card forms on the payment gateway. What do i need to add?
Custom fields in blocked checkout page is still active development by woo team. There is no simple way to do that.
So there is no option for adding credit card fields when selecting the custom payment gateway?
Hi, I would need a help unfortunatly with payment implementation.
Would You consider to contact me?
best regards
Hello,
I am added this code step by step but card fields not shown in checkout page
please check this link
http://tinyurl.com/28ll9c36
So, how i can resolve this issue ?
please help me
Thank you
Hi,
thank you for this tutorial. It helped me a lot.
Is it too difficult to add a logo before the name of the payment method in the label?
Thank you
Hi is display icon worked for you? looking for advise or code sample if you could share. Thanks.
Your new block code for Cart and Checkout pages doesn’t reflect username/password fields for customers to set up at checkout even though it’s checked. You also are not showing custom fields on the checkout page. If you revert back to the WooCommerce shortcode then it shows it so the blocks are not correct. Huge mistake in my opinion.
Thank you for notifying the issue. if you can share the corrected code here, it will help others too.
I was able to show custom credit card fields using BLOCKS in the checkout page, so here is the updated checkout.js file, if someone needs it.
==================================
const settings = window.wc.wcSettings.getSetting(‘my_custom_gateway_data’, {});
const label = window.wp.htmlEntities.decodeEntities(settings.title) || window.wp.i18n.__(‘My Custom Gateway’, ‘my-custom-gateway’);
// Define a custom input field component without JSX
const CustomInputField = ({ id, label }) => {
return React.createElement(‘div’, {className: ‘custom-input-field’},
React.createElement(‘label’, {htmlFor: id}, label),
React.createElement(‘input’, {type: ‘text’, id: id, name: id, required: true})
);
};
// Define the content of your payment method including custom fields, without JSX
const Content = () => {
return React.createElement(‘div’, null,
React.createElement(‘p’, null, window.wp.htmlEntities.decodeEntities(settings.description || ”)),
React.createElement(CustomInputField, {id: ‘my_custom_gateway_card_number’, label: ‘Card Number’})
// Add additional fields as needed
);
};
// Register your payment method with custom fields
const Block_Gateway = {
name: ‘my_custom_gateway’,
label: label,
content: Object(window.wp.element.createElement)(Content, null),
edit: Object(window.wp.element.createElement)(Content, null),
canMakePayment: () => true,
ariaLabel: label,
supports: {
features: settings.supports,
},
};
window.wc.wcBlocksRegistry.registerPaymentMethod(Block_Gateway);
The page has been implemented, but the problem lies in how to transfer values. Submitting an order will prompt an incorrect credit card number.
How to set default checked on showSaveOption or checked after payment?
supports: {
features: settings.supports,
showSaveOption: true,
},
Hello sevengits.com admin, Keep up the great work!
i have followed this steps and now i am not getting compatibility error in admin side when using block based checkout page, but getting this error in site checkout page “Sorry, it seems that there are no available payment methods. Please contact us if you require assistance or wish to make alternate arrangements.”. what must be the issue?