WC Messaging Workflow
Overview
A Workflow is an addon plugin of WC Messaging Pro, automates WhatsApp notifications for WooCommerce orders, providing instant, personalized updates on order status and improving customer engagement.
The WC Messaging Workflow plugin for WooCommerce enhances customer communication by automating WhatsApp messages based on specific order statuses and customizable conditions. Whether you need to notify customers of order confirmations, shipping updates, or delivery reminders, this plugin allows you to tailor your messages precisely to your needs. You can choose to send messages immediately or schedule them for later, ensuring timely and relevant communication with your customers.
Additionally, the plugin supports the inclusion of custom variables in your messages, allowing for a personalized touch that resonates with each recipient. By leveraging these features, you can improve customer satisfaction and streamline your order management process, all while saving valuable time and resources.
Features
- Instant message templates
- Automatically send action message templates when a WooCommerce order status changes, ensuring timely updates to customers.
- Scheduled message templates
- Set message templates to send on a custom delay (hours, days, or weeks) tailored to each WooCommerce order status for flexible follow-ups.
- Immediate or delayed workflow triggers
- Choose to trigger workflows instantly or schedule them with a delay, adjusting the timing to suit your needs.
- Workflow priority settings
- Assign priorities to workflows, so high-priority workflows execute first, giving you control over workflow order.
- Customizable trigger rules
- Define specific rules for each workflow trigger to precisely control when and how workflows activate.
- Order status-based workflows
- Configure workflows for any WooCommerce order status, allowing for tailored actions at each order stage.
- Multiple workflows per order status
- Set up multiple workflows for the same order status and prioritize the sequence to ensure workflows are triggered in your preferred order.
Installation
Log in to your WordPress admin dashboard.
- Go to “Plugins” in the left-hand menu.
- Click on “Add New.”
- Upload the “WC Messaging Workflow” zip folder purchased from the Sevengits website.
- Click on the “Install Now” button next to the plugin you want.
- Once installed, click on the “Activate” button.
- You’re done! The WC Messaging workflow plugin is now installed and active on your WordPress website.
Settings
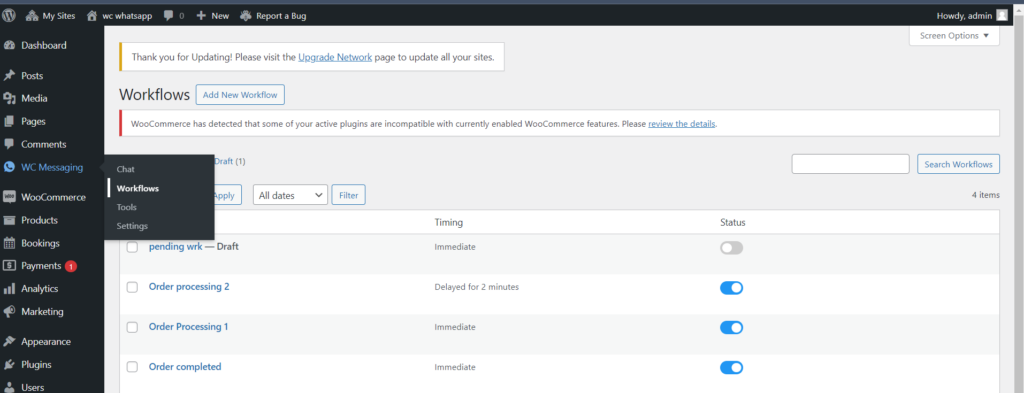
Goto WC Messaging-> workflow -> add new workflow on side nav menu bar

You can add new workflows using the option Add new workflow

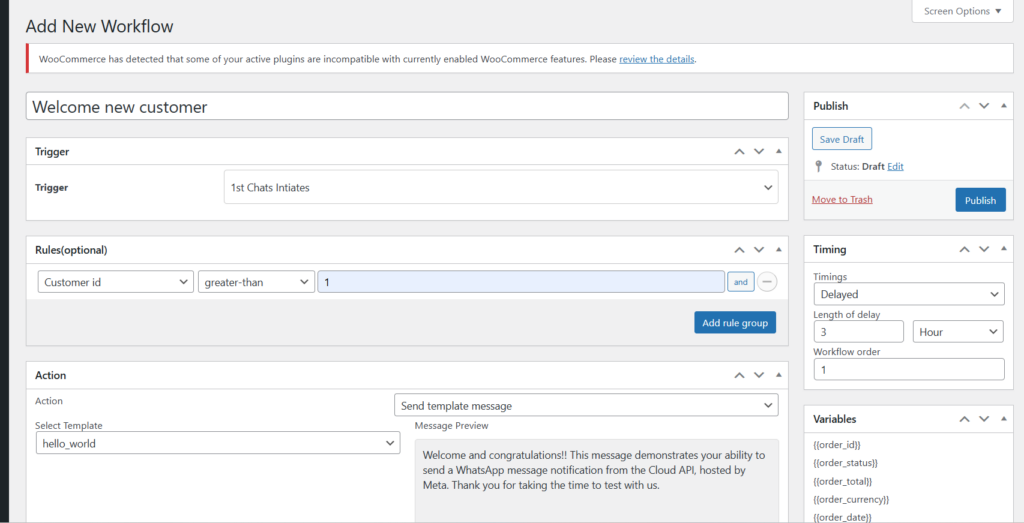
Workflow Name
- Enter a name for your workflow. This name will be the title and will help identify your workflow among others.
Trigger Selection
- Choose when you’d like this workflow to activate. The trigger defines the event that will start the workflow. For example, if you select “First Chat Initiates”:
- The workflow will automatically trigger as soon as a customer initiates a new chat.
- The workflow will automatically trigger as soon as a customer initiates a new chat.
- You can also choose any of WooCommerce’s default order statuses (such as “Order Completed”, “Order Refunded”) as triggers to start the workflow when an order reaches that particular status.
- Example Use Case
- If you select “First Chat Initiates” as the trigger, your workflow will run every time a customer starts a new chat with your team, enabling automated responses or actions.
- Similarly, selecting “Order Completed” will trigger the workflow every time an order completes, allowing for automatic follow-ups, thank-you messages, or feedback requests.
Rules Configuration
Selecting Rules
- Define the rules according to the specific needs of your workflow. Each rule adds a layer of criteria that must be met for the workflow to execute. By setting up rules, you can control when and how the workflow will trigger.
Adding Custom Rules and Operators
- If you need more options beyond the defaults, you can add custom rules and operators by using the following filters:
- apply_filters(‘wc_messaging_additional_rule_terms’, $terms) – Use this filter to add new rule terms specific to your workflow.
- apply_filters(‘wc_messaging_additional_operators’, $operators) – Use this filter to add custom operators (e.g., greater than, less than) as needed.
- These filters allow you to extend the flexibility of your workflows, enabling advanced, custom rule conditions.
Workflow Execution and Rule Check
- Every time the workflow is triggered, the defined rules will be checked. Only when all rules are met will the workflow proceed to execute the designated actions.
Default Options Available
- If no additional customization is needed, simply select from the default rule options. This will apply standard conditions to your workflow execution.
Action Configuration
Send Message Template
- Select a message template to be sent when the workflow is processed. You can choose any template that suits the purpose of your workflow, allowing you to deliver tailored messages to your customers.
Example Use Case
- For instance, if your workflow trigger is set to “Order Completed”, you could select a “Review Request” template. This way, a message asking for feedback will be automatically sent to the customer every time an order is marked as complete.
Timings Configuration
Immediate or Delayed Execution
- Immediate: Choose this option if you want the workflow to trigger as soon as the event happens. The workflow will execute right at the time the trigger event occurs.
- Delayed: Select this to schedule the workflow to run after a specific period has passed since the trigger event. You can set the delay to hours, days, or even weeks, depending on your requirements.
Workflow Order
- If you have multiple workflows set to trigger on the same event, you can control the sequence in which they are executed by setting the Workflow Order. This ensures that workflows will be triggered in the specified order, avoiding conflicts and ensuring smooth execution.
Example Use Case
- For instance, if you set a Delayed timing with a 24-hour delay, the workflow will execute 24 hours after the trigger event (e.g., “Order Completed”) occurs. If you have multiple workflows triggered by “Order Completed,” the workflows will run in the order specified.
Variables
Using Variables for Templates
- Variables allow you to pass specific parameters into message templates, like customer names or order details. You can select these variables from the provided list. Simply click on a variable to copy it.
Adding Variables to Templates
- When adding a variable to your template, enclose the variable name in double braces (
{{ }}). For example,{{customer_name}}will automatically be replaced with the actual customer’s name during workflow execution.
Direct Text for Static Information
- If you want to include static information, like your company name, you can type it directly without using double braces. For instance, typing “Your Company Name” will appear exactly as written in the final message.
Then publish the workflow.
Plugin Update
You will be notified about new feature updations along with a changelog. You can read about the fixes and features and can update our premium plugins like how you update other WordPress plugins.