WC Messaging Pro -WhatsApp Cloud Messaging API Integration for WooCommerce
Overview
This documentation is no longer updated and latest documentation can be found notiqoo.com/docs
WC Messaging pro – The WooCommerce WhatsApp plugin utilizes the WhatsApp Cloud API server, enables two-way WhatsApp messaging with customers , helps customers to get support over WhatsApp.This WooCommerce WhatsApp plugin provides full-time support on WhatsApp for any order-related queries or follow-ups customers may have. using webhooks admin can receive messages from customers sent through WhatsApp. and it also facilitates the delivery of automated free WooCommerce WhatsApp order notifications.
To use the WC Messaging Pro plugin, you need a mobile number that is not associated with WhatsApp or WhatsApp Business on your mobile device. This number will be used exclusively for the WhatsApp Cloud API. You will still receive calls and SMS on this number, but it cannot be used with the WhatsApp mobile app. Facebook’s WhatsApp Cloud API restricts a mobile number to be used either with the mobile app or the WhatsApp cloud API, but not both. read more about phone number requirement in WhatsApp cloud api.
This WhatsApp business API integration with WooCommerce plugin also enhances personalized communication through WhatsApp template messaging, allowing the WooCommerce store owner to engage with customers more effectively. Notably, WC Messaging Pro is the WhatsApp chat supported pro WordPress plugin compatible with WooCommerce booking plugins, ensuring a simple and comprehensive WooCommerce booking experience for users and providing convenient WooCommerce custom trigger buttons for ease of use. WhatsApp WooCommerce plugin offers basic reports, allowing users to gain insights into their orders efficiently. To further enhance the user experience, WC WhatsApp Messaging Pro includes two essential features: quick reply and message mark-as-read options.
Additionally, introducing a Customized Widget Tab for messaging, featuring Click to Chat links, WhatsApp QR codes, and customizable chat icons, allowing customers to order through WhatsApp and engage directly with the business.
WC Messaging Pro -The WooCommerce WhatsApp plugin supports the WooCommerce blocked checkout
Features-Free v/s Premium
Free Version
- Send WooCommerce WhatsApp order notifications: Automatically send WhatsApp notifications for WooCommerce orders using the official WhatsApp Cloud APIs.You can automate WooCommerce WhatsApp order notifications for various statuses, including pending payment, processing, on hold, completed, canceled, refunded, failed, and draft.
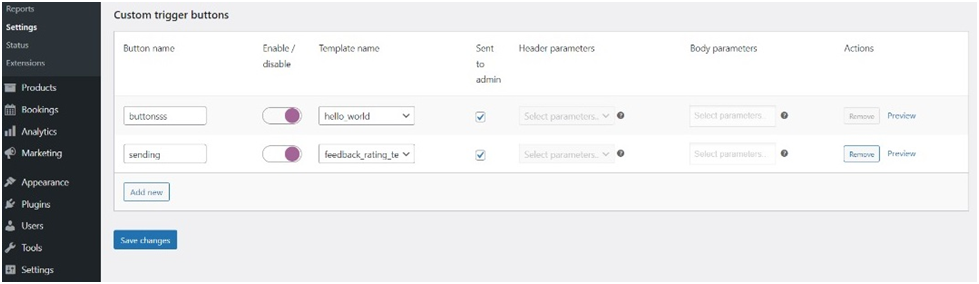
- Custom trigger buttons – custom trigger buttons on the WooCommerce order details page, enabling admins to send custom pre-defined message templates to customers with just a click.
- Sending template messages separately to admins and customers: This feature allows sending separate template messages to admins and customers, ensuring targeted communication. You can assign different templates of your choice for each group, catering to their specific needs.
- Abandoned Cart Recovery: Enable automated messages to recover lost sales directly from the WC Messaging Chat Dashboard.
Premium Version
- All Features of the free version – WhatsApp WooCommerce integration premium version contains all features of WC Messaging free version like Sending default order alerts reminders on WhatsApp via message templates, Sending timely updates, Providing efficient business operations, etc.
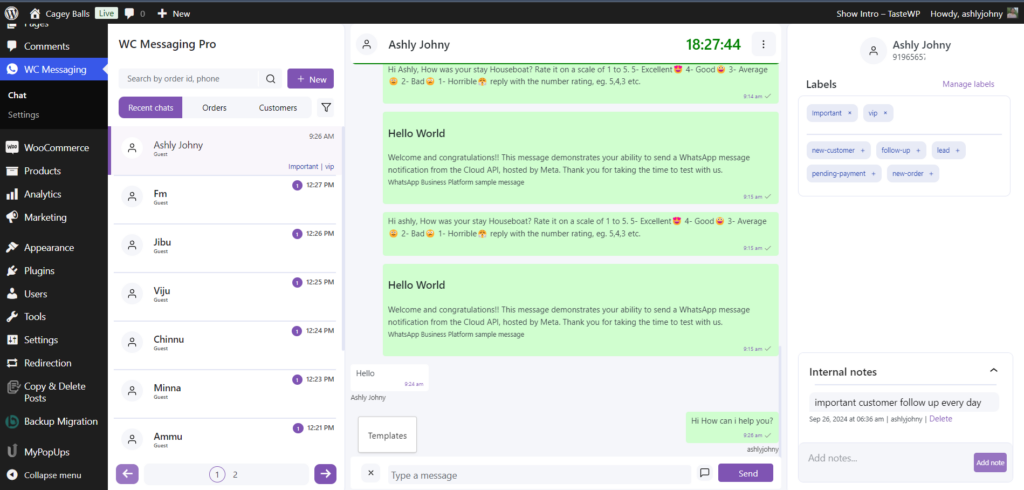
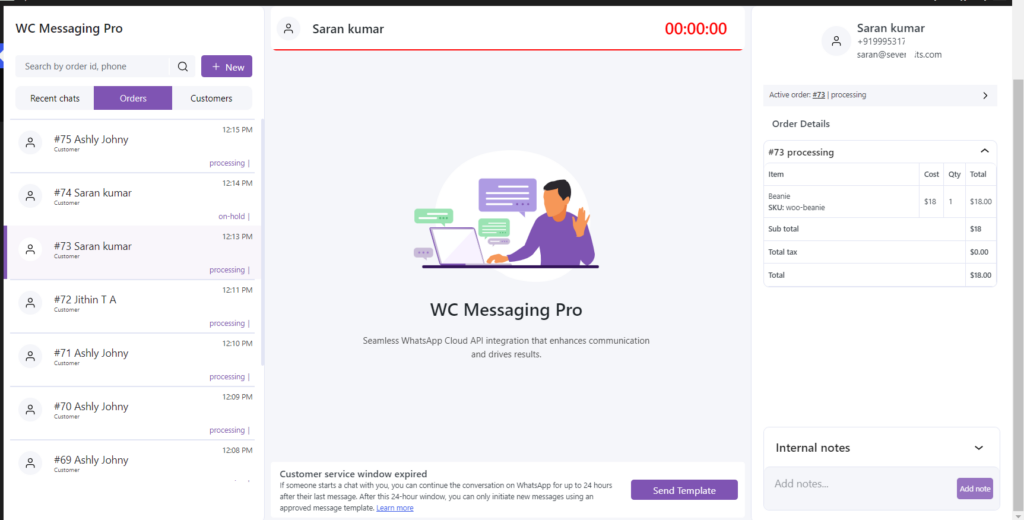
- Enable two-way messaging with customers- You can send and receive messages via WhatsApp, allowing for interactive conversations between businesses and customers. Using webhook admin receives messages from customers sent through WhatsApp.
- Compatibility with WooCommerce Booking Plugins: WooCommerce WhatsApp plugin seamlessly integrates with WooCommerce booking plugins for a comprehensive booking solution
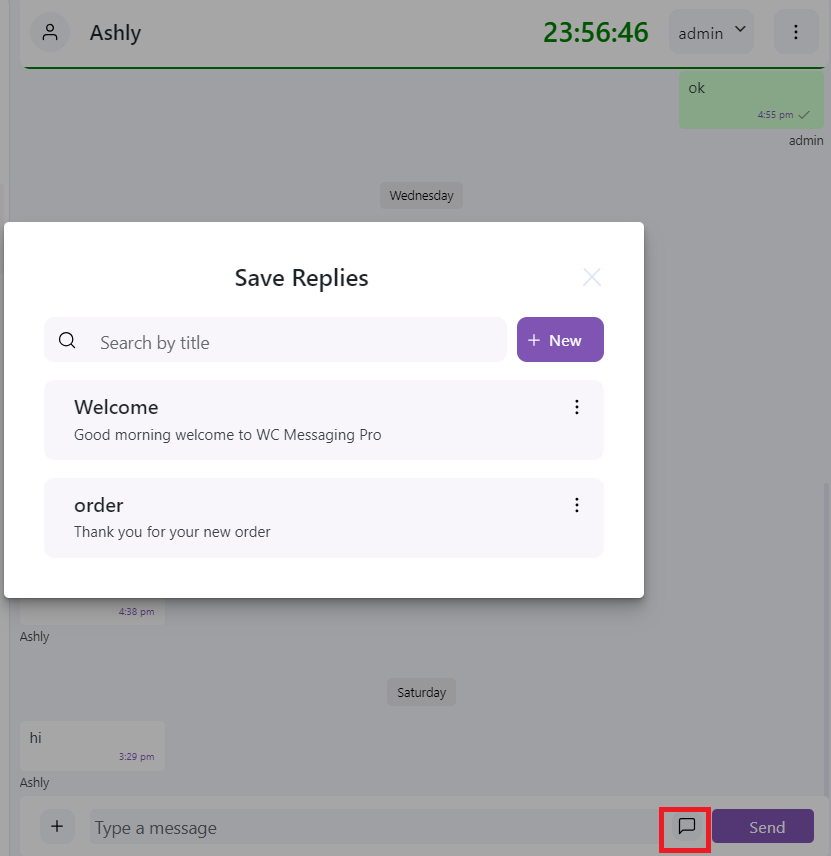
- Quick Reply: WooCommerce WhatsApp plugin introduces a quick reply feature, enabling administrators to promptly respond to customer inquiries.
- Mark as Read: WooCommerce WhatsApp Pro plugin provides administrators with the capability to mark all messages as read, streamlining message management for enhanced efficiency.
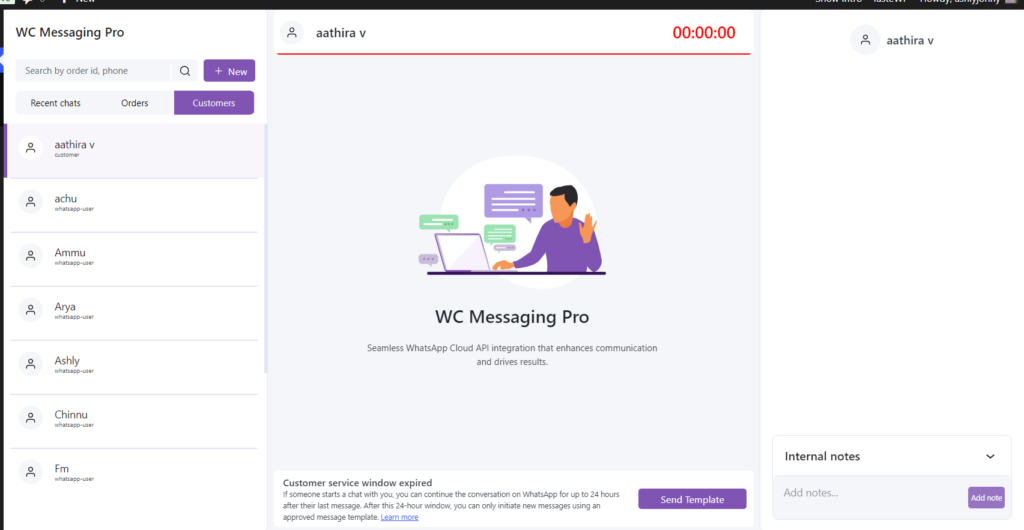
- New Contact Addition from Chat Screen: You can now add new WhatsApp contacts directly from the chat screen and start conversations seamlessly.
- 24-Hour Messaging Window Timer: Implemented a timer feature to efficiently track the 24-hour window for customer interactions, ensuring timely management of message limits.
- Quick Note Feature: Added a quick note functionality, enabling you to create and manage notes during conversations for enhanced context and smoother follow-up.
- Message Templates: Implemented customizable message templates, helping to streamline responses and ensure consistent communication while saving time.
- Dedicated Chat Menu: Launched a standalone chat menu, giving you direct access to chat features and settings through a separate navigation section.
- WhatsApp Interactive Flows: Seamlessly manage multi-screen interactions, guiding customers through step-by-step processes via the chat interface.
- Document Send/Receive: Effortlessly share and receive documents through the WC Messaging Chat Dashboard for smoother communication.
- Customized Widget Tab: WordPress WhatsApp Pro plugin introducing our new Customized Widget Tab for messaging! This tab comes with some exciting new features:
- Click to Chat: Simply put, we provide you with a link. You can place this link anywhere you like, and customers can click on it to start chatting with your WooCommerce WhatsApp business directly.
- WhatsApp QR Code: We offer a QR code that, when scanned, connects customers directly to your business chat on WhatsApp. It’s as easy as scanning and chatting!
- WhatsApp Chat Icon: Simply enable it, and an icon will appear on your site. When clicked, customers can chat directly with your admin. Customize the label, message, and position to your liking.
- Shortcode: Use the shortcode [woom-chat-widget] to show the WhatsApp chat icon wherever you want on your site.
NOTE: According to Facebook’s guidelines,customers must initiate conversations on Messenger. Admins have up to 24 hours to respond. After this time, admins cannot initiate new chats, but they can send template messages as required. If the customer starts another chat, admins can reply and begin the conversation.
Facebook WhatsApp Configuration
Watch the video tutorial to learn how to set up
The first thing we need to do is create an app and generate some tokens in Facebook developer.
This sounds complicated, but we’ll walk you through every step of the way:
- First, log in to developers.facebook.com.
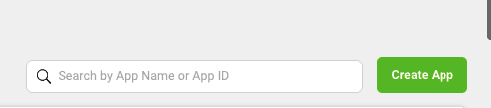
- Then click on the My Apps link in the menu at the top of the screen. Then, click the Create App button on the right-hand side.
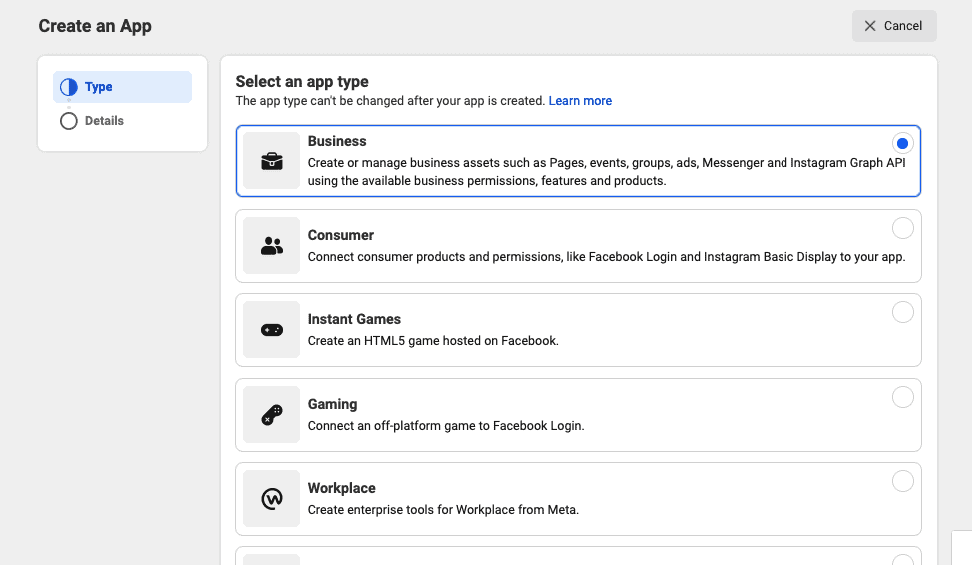
3. Click the Others menu on the page that appears and then the Next button
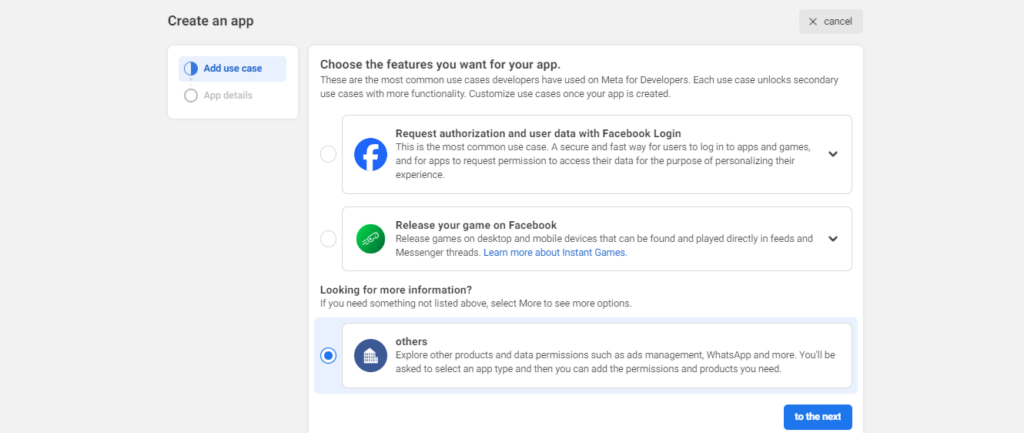
4. Click Business on the page that appears and then the Next button.
5. In the next step, enter your app name and email (these are for admin purposes). Then select Business Account. Next, click the Create App button.
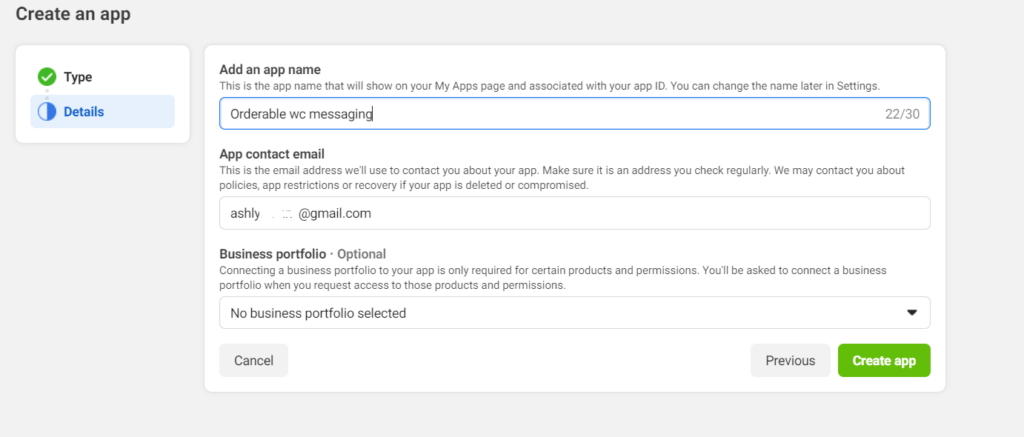
6. Enter your Facebook account password in the confirmation popup.
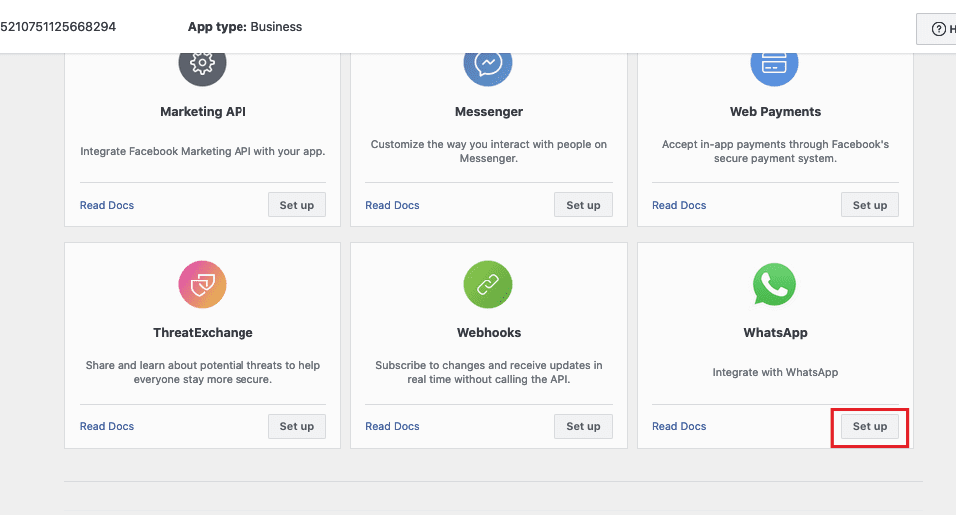
7. The app will then be created and you’ll be asked to select the products you want to add to the app. Scroll down and click the Set up button under WhatsApp.
8. On the next page, select or create a Meta Bussiness account using the dropdown. Then click Continue.
9. It will redirect you to the Getting Started page. Now you need to add your phone number to the WhatsApp API. This will be the number from which your store’s messages will be sent.
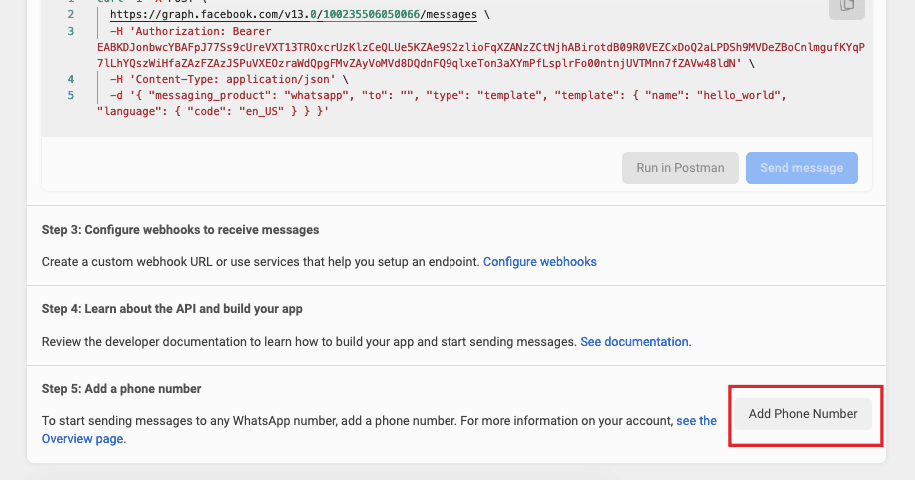
10. Once clicked, you’ll need to enter the details for your WhatsApp account profile.
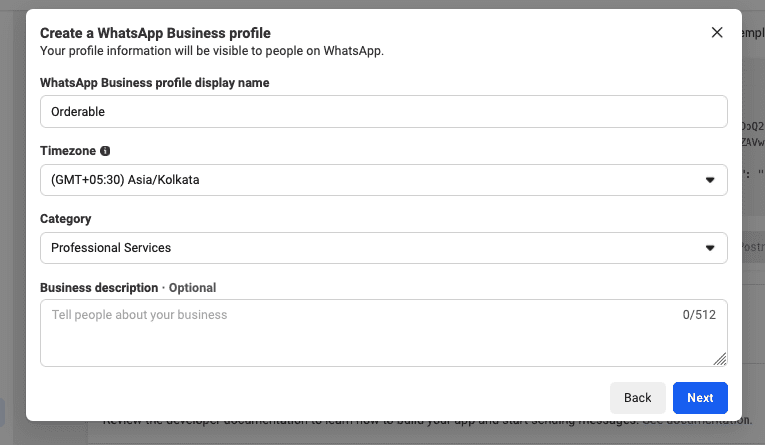
11.Enter your phone number and verify it by entering the verification code received.
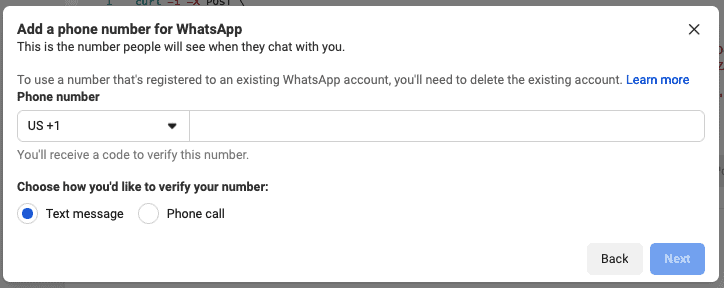
NOTE: A Facebook API phone number can only be registered in one service at a time; if your number is registered in the WhatsApp Business Cloud API, it cannot be registered in the WhatsApp app. It is not possible to have the phone number registered in the WhatsApp Business API to use anywhere, and do not use it for anything else. Numbers already in use with the WhatsApp Messenger app or WhatsApp Business app cannot be registered unless they are deleted first.
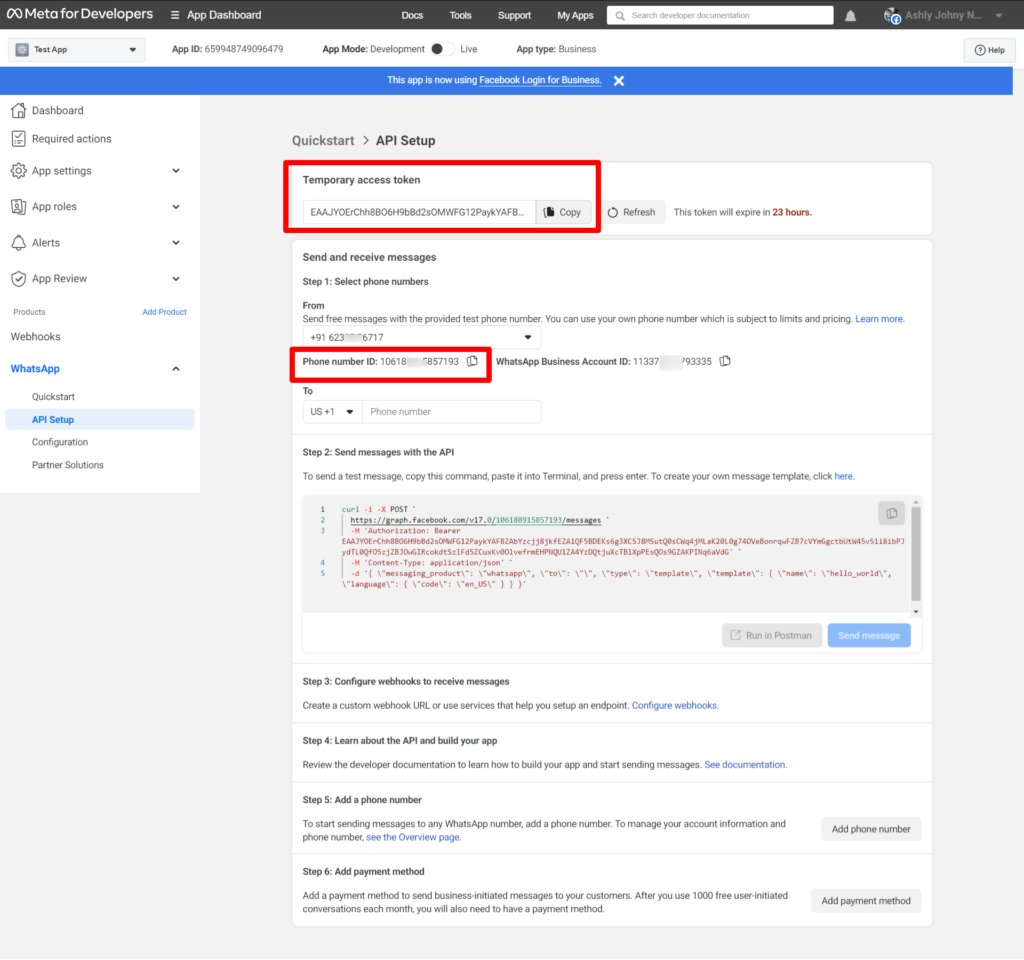
12. Now the WhatsApp app is all set up, copy the Access Token, Phone Number ID, and Business Account ID. We’ll add these into Orderable in the next few steps.
WooCommerce WhatsApp Installation
Log in to your WordPress admin dashboard.
- Go to “Plugins” in the left-hand menu.
- Click on “Add New.”
- Upload the “WC Messaging Pro” zip folder purchased from the Sevengits website.
- Click on the “Install Now” button next to the plugin you want.
- Once installed, click on the “Activate” button.
- You’re done! The WC WhatsApp plugin is now installed and active on your WordPress website.
- Goto WooCommerce -> settings -> advanced
Watch the video tutorial to learn how to set up
Settings Page
General Settings
Watch the video tutorial to learn how to set up
Go to WC Messaging -> settings -> General
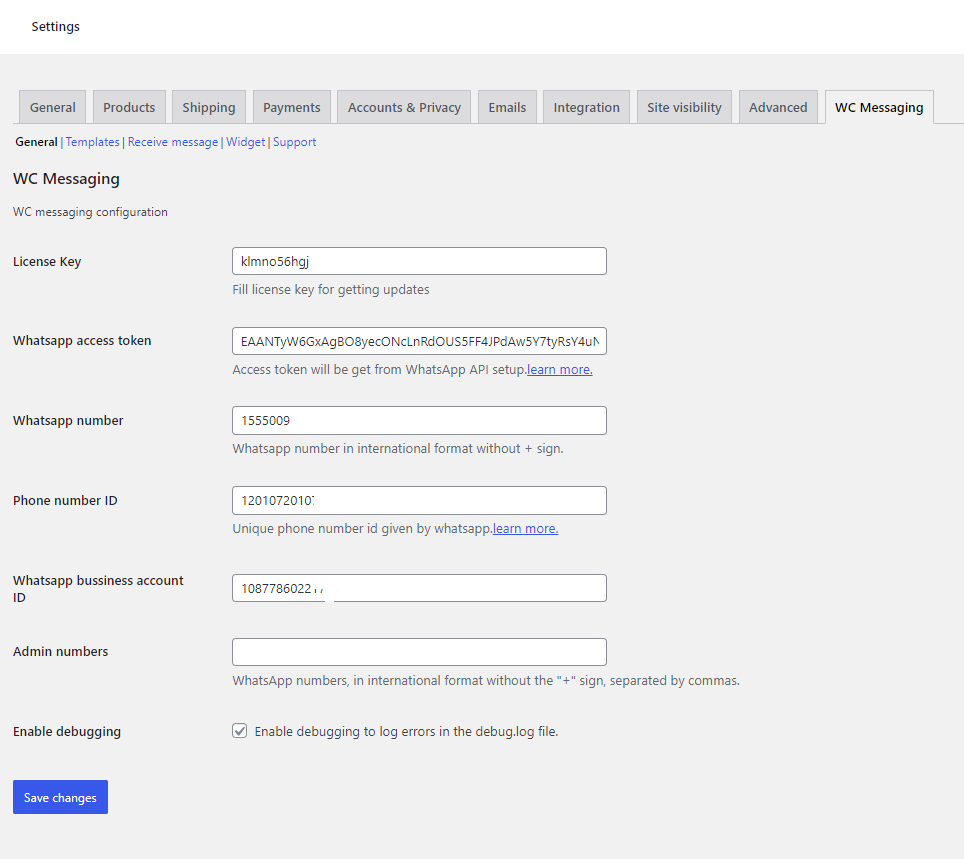
- License key: The license key can be obtained from sevengits website
- WhatsApp Access Token: Access token can be obtained from https://developers.facebook.com/apps/ Temporary token is valid only for 23hrs. So, if you require a permanent token create a system user and generate the token. Learn how to create a permanent token
- WhatsApp Number: The provided number matches the one entered in the facebook developer platform.
- Admin notification numbers: These are admin WhatsApp numbers to send notifications. Separate each mobile number by a comma and add the country code.
- Phone number ID and WhatsApp Business Account ID can be got from facebook Developer Platform.
- save all changes
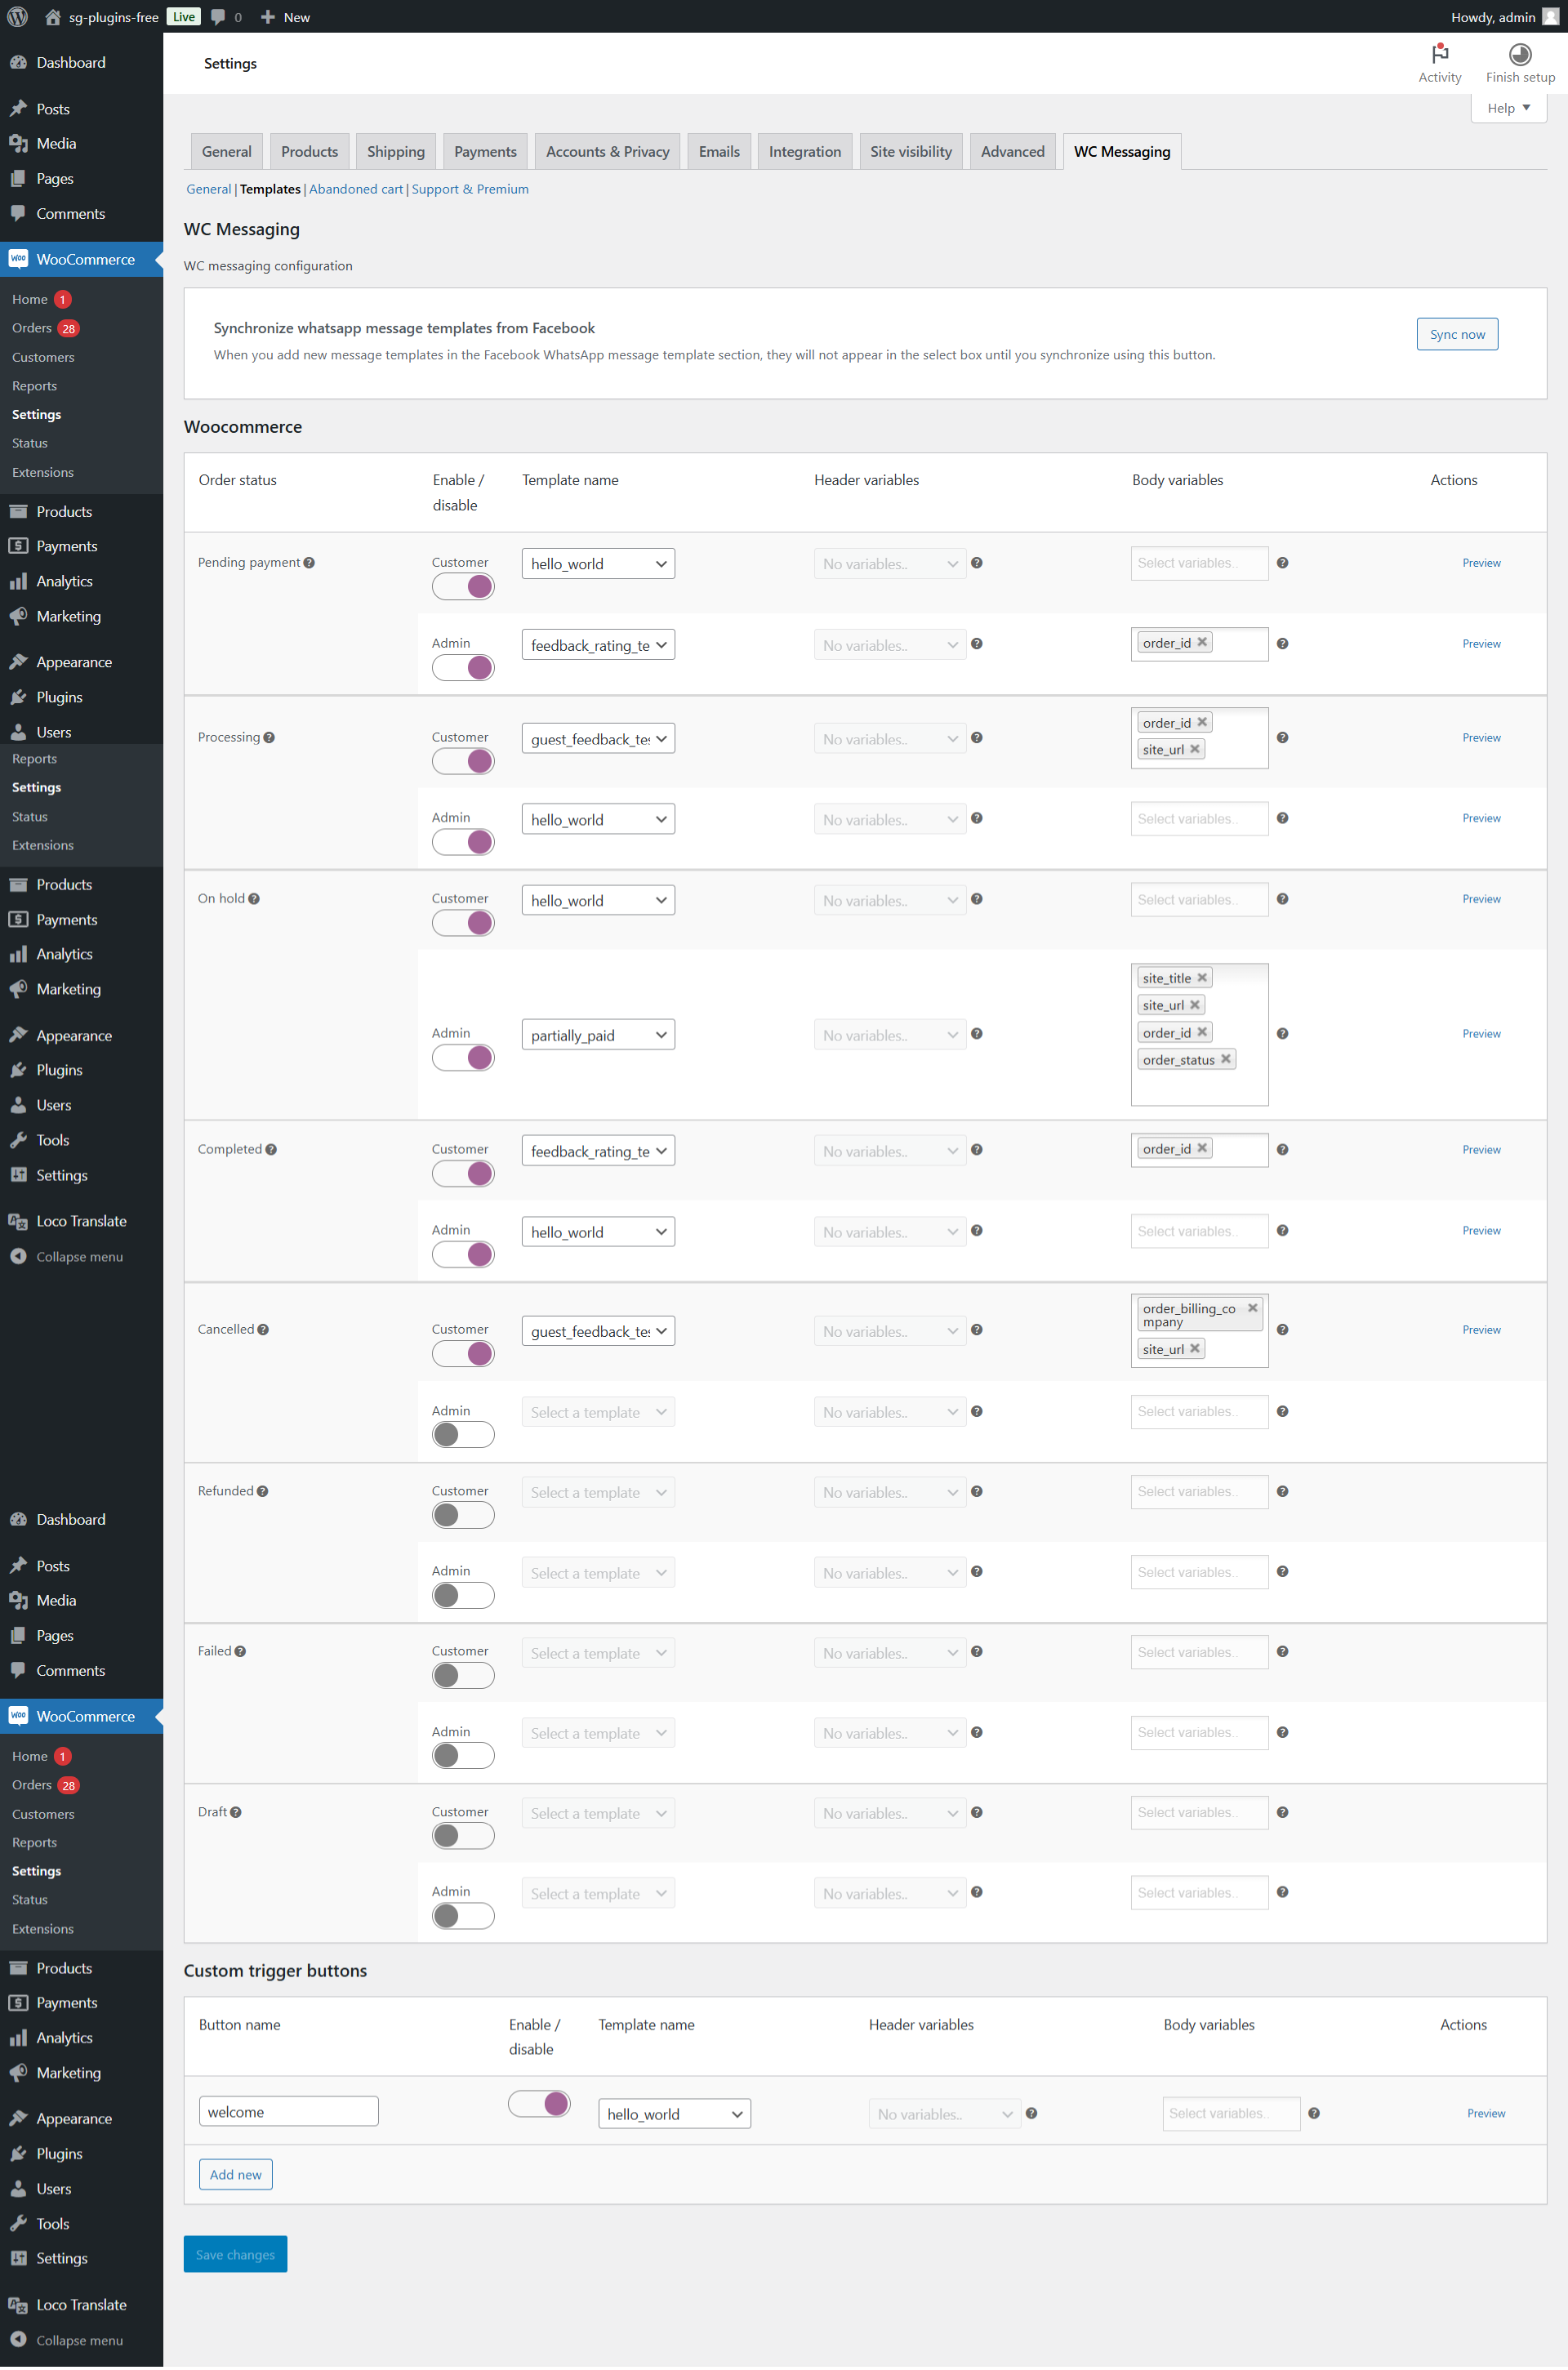
Template Settings
Watch the video tutorial to learn how to set up
Go to WC Messaging -> settings -> Templates
- Enable WooCommerce WhatsApp Order Status Notifications by specifying the necessary details and selecting a template name from the dropdown menu. You can customize the template parameters separately for the header and body. You can set different or the same templates for customers and admins. Choose to enable or disable notifications for admins and customers based on your preference. If you don’t want to send messages to admins, simply disable the admin.
When you add new message templates in the Facebook WhatsApp message template section, they will not appear in the select box until you synchronize using Sync now button.
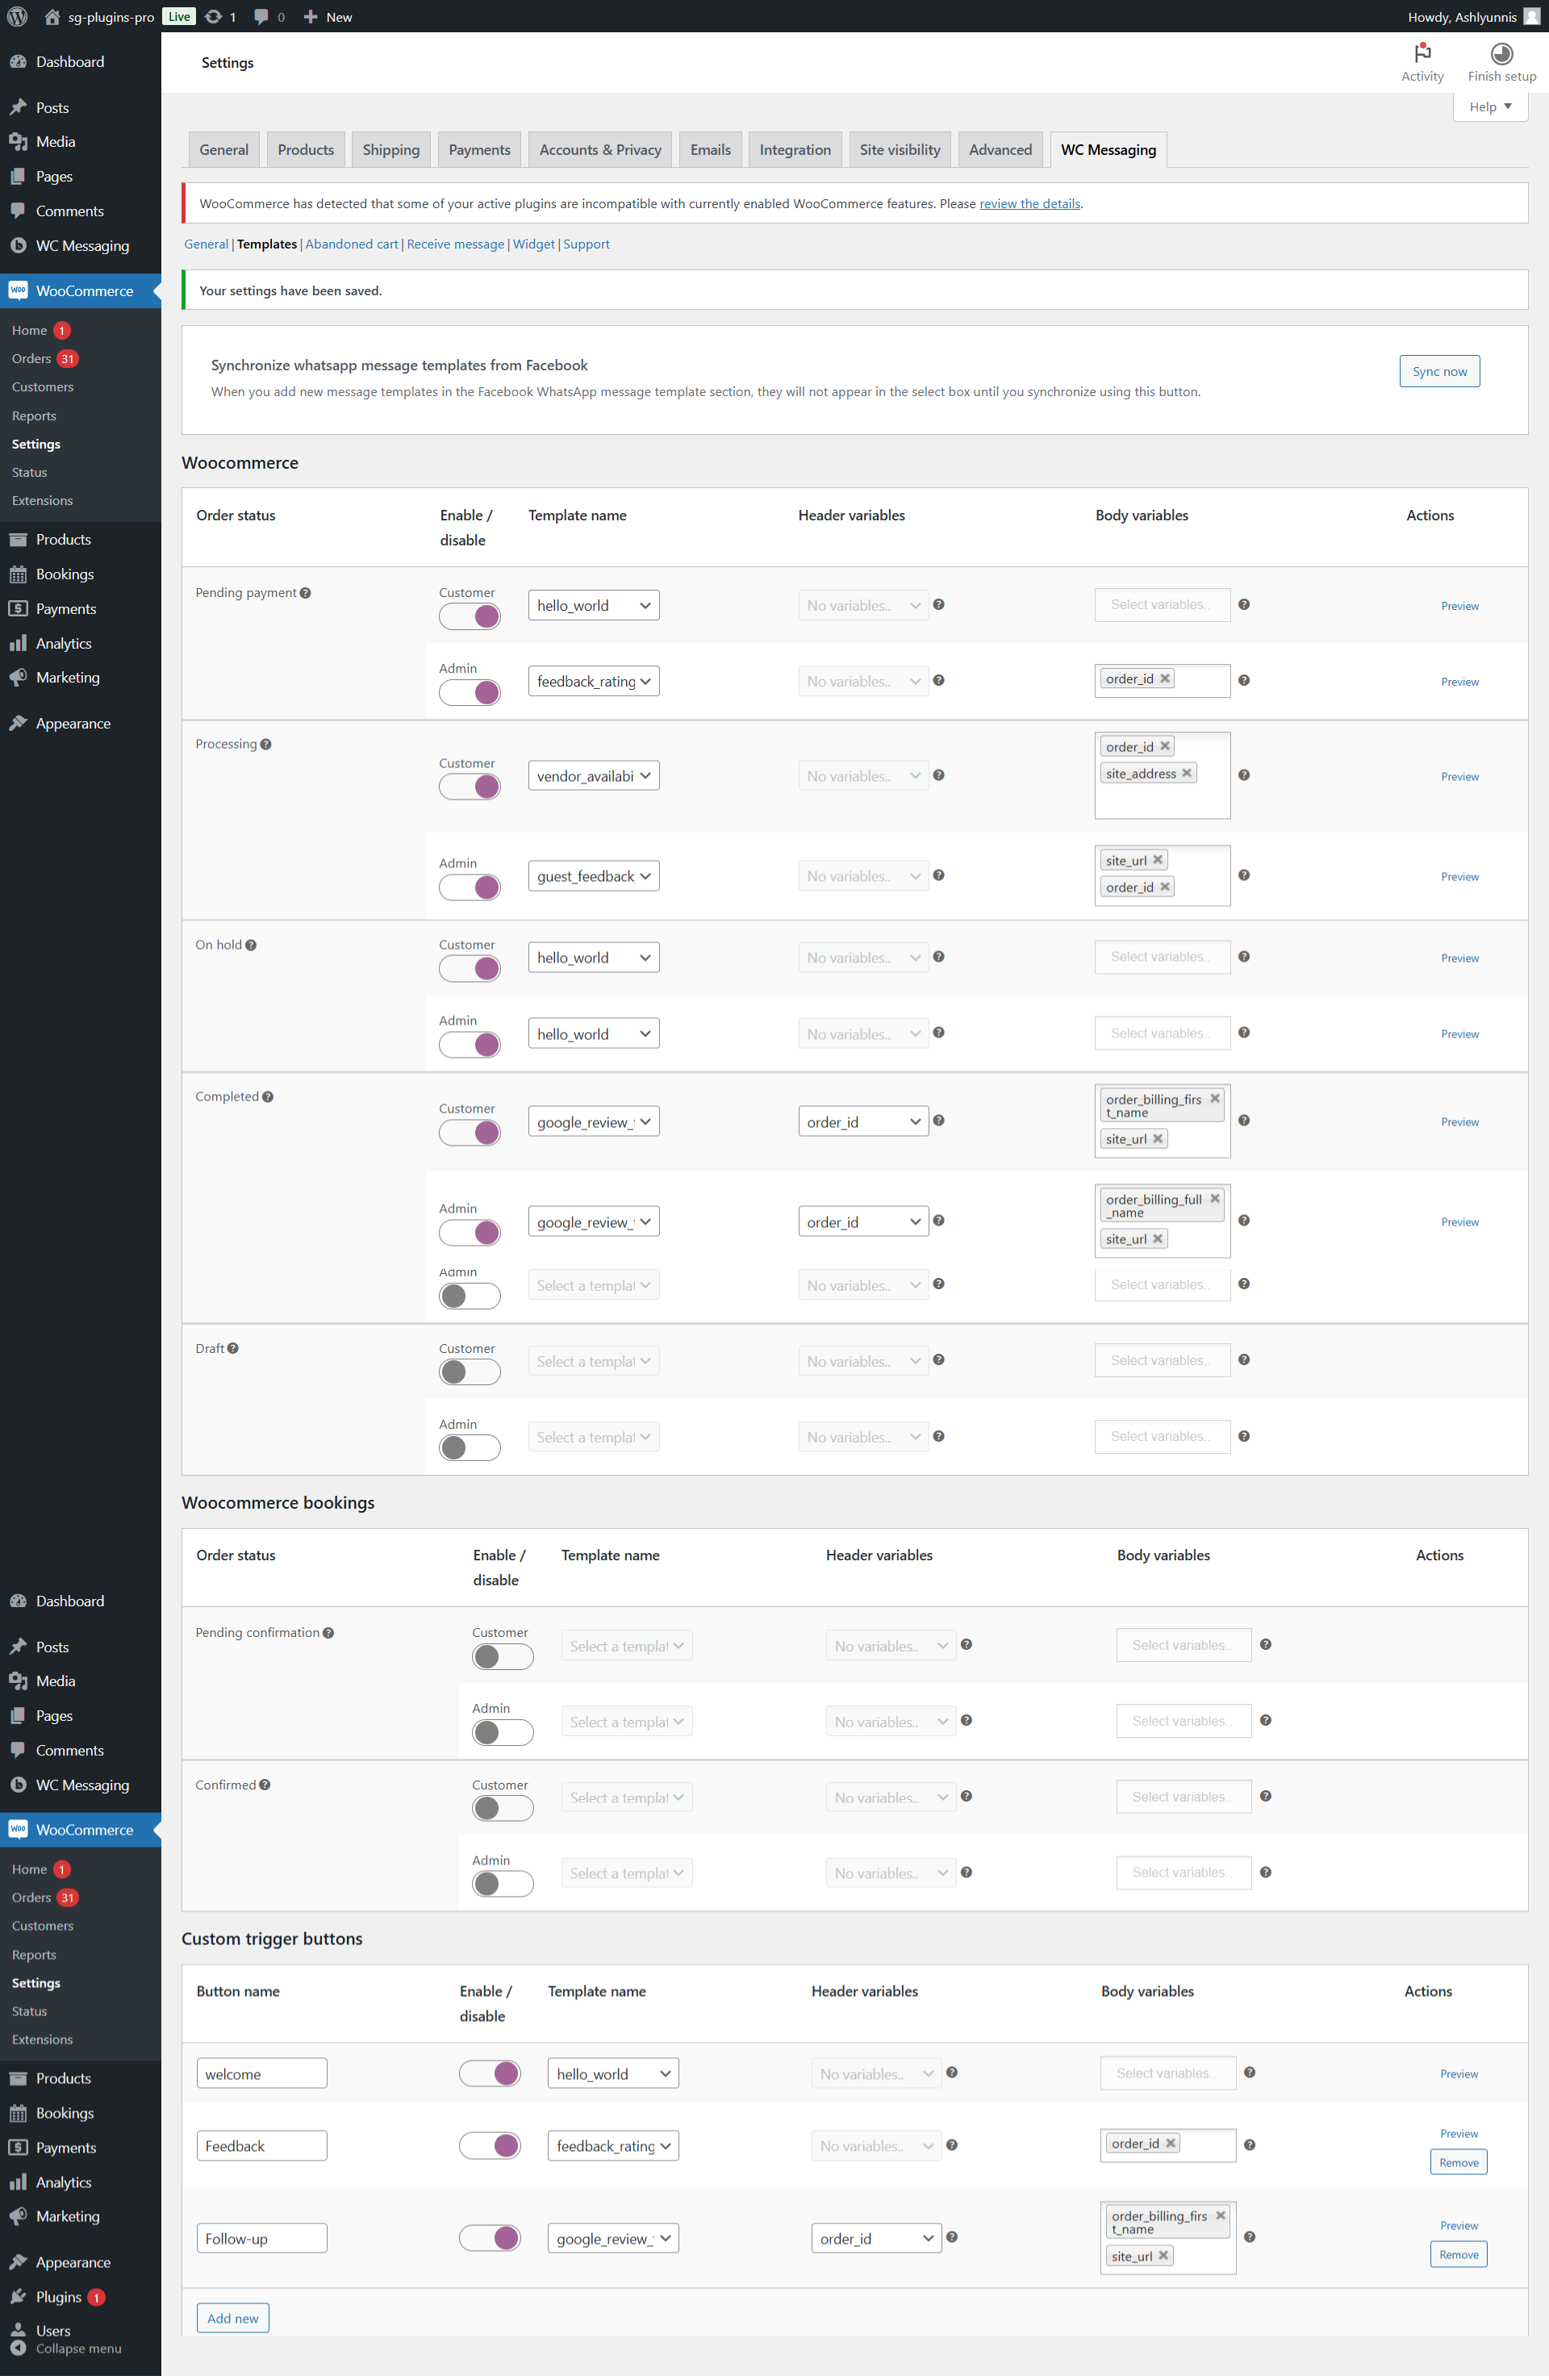
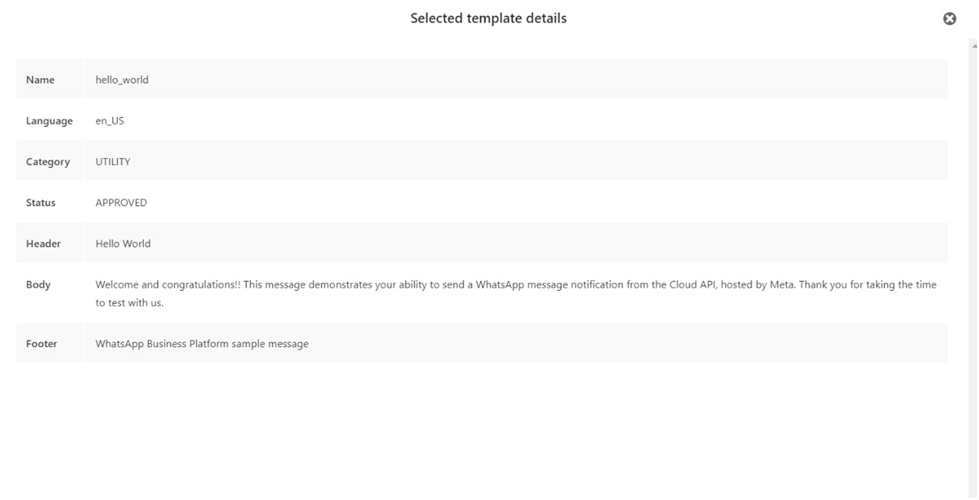
Preview the final template message in the preview section.
If you’re able to create a custom template, you can define suitable parameters for it. Adding a filter hook allows you to create these parameters dynamically. Here’s a demonstration using a sample filter hook placed in the theme’s functions.php file:
add_filter('woom_additional_template_params', 'function_name', 10, 2);
function function_name($parameters, $order)
{
    $custom_params = array(
        "param1" => '',
        "param2" => ''
    );
    if ($order !== null) {
        $custom_params = array(
            "param1" => 'value1',
            "param2" => 'value2'
        );
    }
    $parameters = array_merge($parameters, $custom_params);
    return $parameters;
}
With this filter hook, you can dynamically customize the parameters of your template. After placing the code in your theme’s functions.php file, the created parameters will be accessible in your template. To view details about these parameters by hovering over the question mark near the parameter section(right side), ensure that the parameters are properly defined.
For detailed usage of this custom filter check this blog post: Add custom parameters on WC Messaging template’s
2. If you’re setting up WooCommerce Bookings, be sure to turn on Booking notifications.

3. If want more buttons add them and save all the change
Abandoned Cart Settings
Watch the video tutorial to learn how to set up
Go to WC Messaging settings -> Abandoned cart
The Abandoned Cart feature in WC Messaging Pro helps recover lost sales by sending personalized template messages to customers who leave items in their cart without completing the purchase. It identifies abandoned carts based on WooCommerce order statuses, such as “Pending Payment,” and allows businesses to define additional statuses using a customizable hook. Users can set a cut-off time for when carts are flagged as abandoned and send reminders with coupon offers or integration webhooks for external systems.
The WC Messaging plugin offers powerful settings to manage abandoned carts under WC Messaging > Settings > Abandoned Cart. Here, you can define the cutoff time to classify an order as abandoned, with a default setting of 20 minutes. You can customize which order statuses should qualify as abandoned using a filter, allowing you to tailor the functionality to suit your business needs.Additionally, you can create and delete abandoned cart coupons as needed, offering flexibility for your marketing strategies. By enabling a webhook URL, you can receive real-time notifications at the time of cart abandonment and recovery, ensuring you’re always updated. The “Trigger Sample” button allows you to test and verify the webhook functionality effortlessly.
You can also configure template messages to be sent at specific times based on your preferences, including options to attach coupons. These coupons can be further customized using advanced filters for personalized customer outreach.
If abandoned carts are a concern, the plugin provides detailed documentation to guide you through the setup and best practices for maximizing cart recovery rates.
You can customize which WooCommerce statuses are considered abandoned using the woom_abandonment_status filter .
For example:
$statuses = apply_filters('woom_abandonment_status', ['your-statuses']);allows you to add your custom filter to specify which statuses are considered abandoned.
Want to learn more about abandoned carts? Click here!
Receive message Settings
Watch the video tutorial to learn how to set up
Go to WC Messaging settings -> Receive message
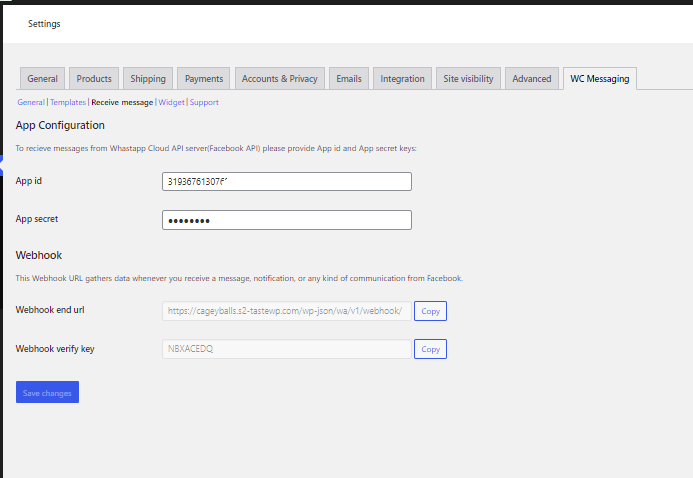
Provide the App Id and App secret key, To find these,
go to your Facebook App Dashboard.
Navigate to App Settings -> Basic.
Here, you will see both your App ID and App Secret Key.
Copy these values and enter them in the required fields.
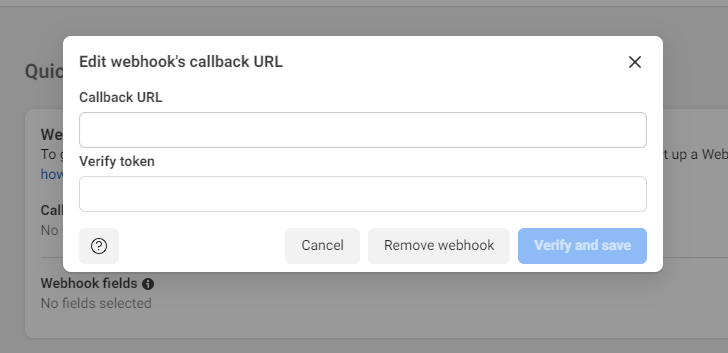
webhook end URL and webhook verify key is automatically generated in setting page. Finally, save changes.
Webhook URLs link our website to Facebook, letting data move from Facebook to our site. When we add this webhook, we create a direct connection for quick communication between the two platforms. This helps information flow instantly between Facebook and our site.
Go to the Developer app dashboard,Then select WhatsApp, go to the configuration section, click on the Edit menu, and proceed to input the webhook callback URL and Verify token .Then click the Verify and Save button
App secret key and Webhook
App secret key serve as credentials for authentication, acting similarly to a combination of a username and password. The App Secret Key helps validate messages from Facebook to your webhook URL, ensuring secure communication for your chats.
Webhook URLs link our website to Facebook, letting data move from Facebook to our site. When we add this webhook, we create a direct connection for quick communication between the two platforms. This helps information flow instantly between Facebook and our site.
Customized Widget Settings
Watch the video tutorial to learn how to set up
To configure custom widget options like Click to Chat or WhatsApp QR Code, navigate to WC Messaging -> Settings -> Widgets. If you want WhatsApp chat icon then enable the chat icon and adjust its label, message, and position according to your preferences. Once done, use the shortcode [woom-chat-widget] to display the WhatsApp chat icon anywhere on your site. Don’t forget to save your changes to apply them effectively.
NOTE: To use any chat widget options make sure to provide your WhatsApp number WC Messaging settings page.
You already have a plugin that validates phone numbers, there’s no need to enable custom validation.However, if you start receiving a high volume of invalid phone numbers which lead to non delivery of WhatsApp messages, enabling custom validation will help manage and reduce those spam messages.
With WC Messaging Pro, admins can choose to send WhatsApp notifications to billing numbers, shipping numbers, or both. They also have the option to disable WhatsApp notifications altogether.
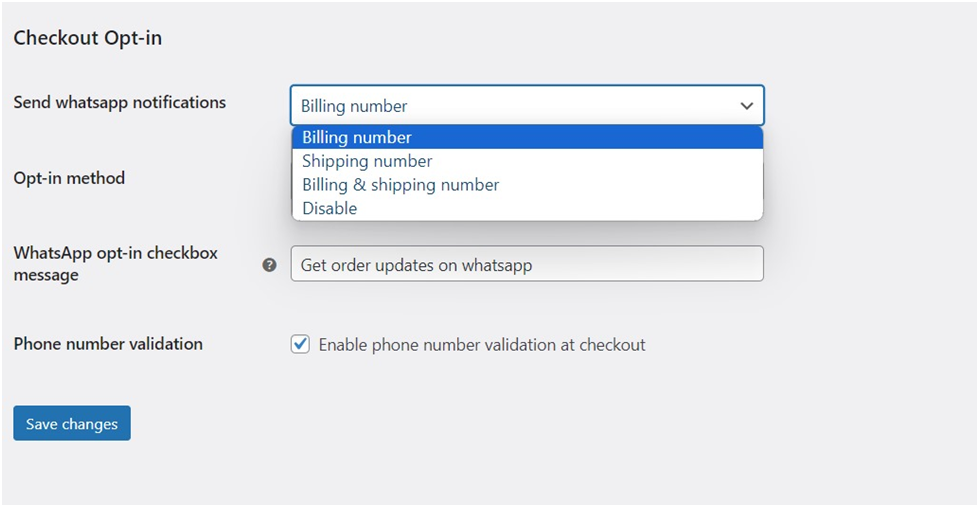
Admins can choose between two opt-in methods: ‘Show checkbox for customer consent’ or ‘Send messages without customer consent.

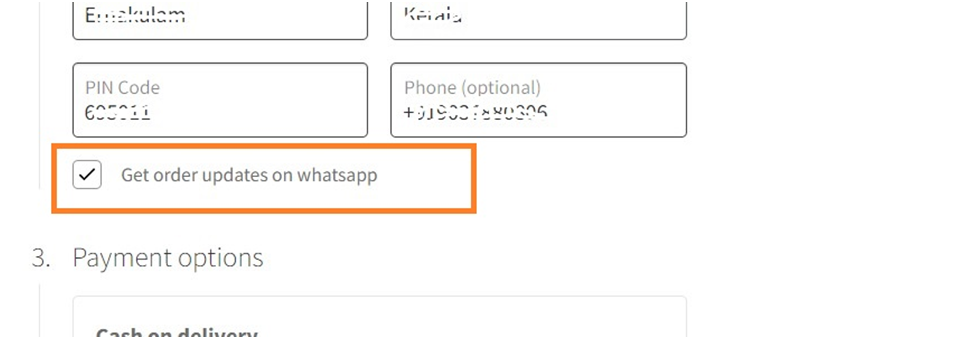
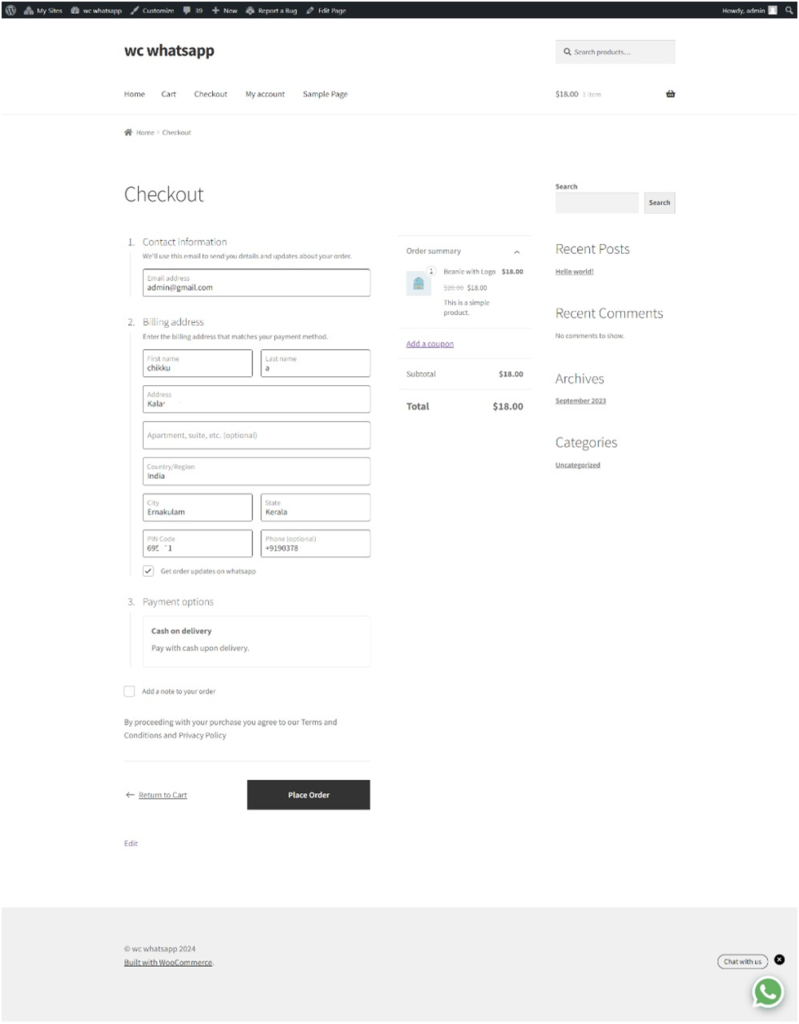
‘ With the first option, a checkbox appears on the checkout page for customers to agree to receive WhatsApp notifications. If they don’t tick the box, notifications won’t be sent.
With the second option, notifications are sent to customers without their explicit consent.
Admin can customize the WhatsApp opt-in checkbox message according to their preference. They have the freedom to write any message they like.
How To Sending Flows
Watch the video tutorial to learn how to set up
WhatsApp Flows is a feature of the WhatsApp Business Platform that allows businesses to create interactive experiences with customers within WhatsApp. It combines automated messages with buttons, lists, and forms to guide users through specific actions and processes.
You can use Flows to generate leads, recommend products, get new sales leads, or anything else where structured communication is more natural or comfortable for your customers.WC Messaging now supports WhatsApp Interactive Flows, enabling step-by-step guided interactions with customers. Create dynamic, multi-screen conversations for a smoother and more engaging experience.
Discover more about WhatsApp Interactive Flows and access detailed tutorials by clicking here.
WC Messaging Plugin Update
You will be notified about new feature updations along with a changelog. You can read about the fixes and features and can update our premium plugins like how you update other WordPress plugins.
WC Messaging Pro complete tutorial
NOTE : WC Messaging Pro supports WooCommerce blocked checkout
Screenshots


Support
To access the WooCommerce WhatsApp premium version with a valid license key, please mention your license key in the subject line when purchasing from us. Contact us.
WC Messaging Plugin
Disclaimer: All trademarks, logos, and brand names mentioned in this plugin are the property of their respective owners. This plugin is not affiliated with or endorsed by WhatsApp or any of its affiliates.