Chikkili-GPay India for Woocommrece
GPay India for Woocommerce – Overview
The Chikkili – GPay India for Woocommerce Plugin, also known as the gpay woocommerce plugin, is a robust solution that seamlessly integrates Google Pay as a payment gateway for WooCommerce. This versatile gpay wordpress plugin empowers WooCommerce shop owners to automatically accept payments through Google Pay, ensuring swift order confirmations and simplifying the payment process.
This user-friendly Google Pay for WooCommerce solution enhances the shopping experience, offering a secure, trusted, and convenient payment method, tailor-made for the Indian market. Whether you’re running a woocommerce google pay-powered online store, a google pay woocommerce outlet, or a wordpress google pay plugin website, this comprehensive plugin simplifies payment integration, making it a seamless experience. It’s an ideal choice for businesses seeking to add Google Pay to WooCommerce, making payments more efficient and user-friendly. This woocommerce google play plugin ensures that online shoppers can complete transactions with ease, enhancing both sales and customer satisfaction.
While activating this plugin, customers can choose Google Pay as payment gateway and proceed to pay with the app installed on their device.
It uses a seamless integration, allowing customers to pay on your website that doesn’t cost you any transaction fee..
Note: For the proper working of this plugin,
- Ensure that you’ve installed Google Pay and completed the onboarding process.
- Use Chrome for Android 60 or above (Chrome stable or Chrome Beta).
To completely configure the plugin, you need to set up your Google Pay Business Console account and then enable our plugin on your WordPress site.
Register GPay India for WooCommerce Business ?
Google Pay’s new Business Console streamlines the way you integrate Google Pay into your apps and websites.
Getting started is easy. Just head to this guide to Set up Google Pay for Business.
If you’ve already integrated with Google Pay, log in with your account to see your existing integrations or create new ones. And if you haven’t integrated with Google Pay yet, simply create your business profile, build an integration, and submit it for approval directly from the console.
You may need VPA, Payee Name, and MCC code to configure the plugin. Note it down from the business console.
After configuring the payment console account, head over to your website and activate the Plugin.
Configure the Plugin?
To activate the plugin,
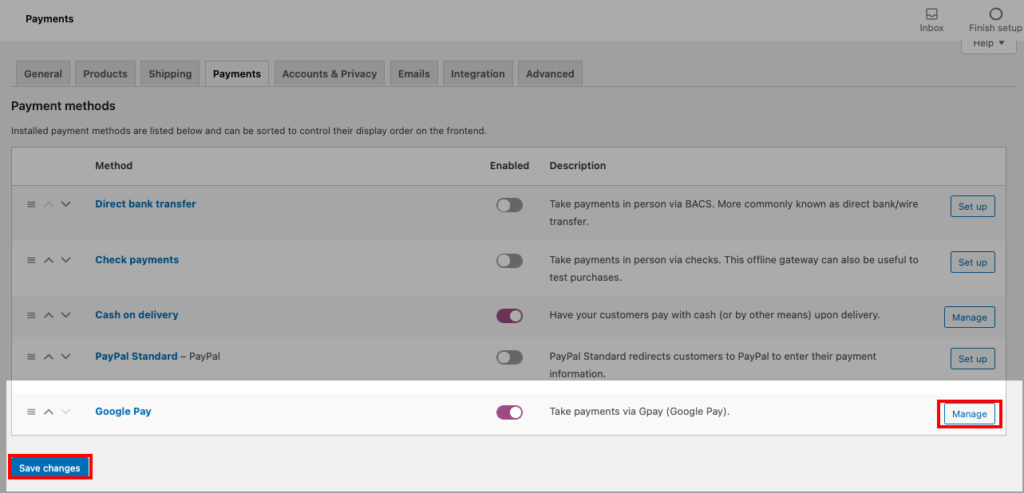
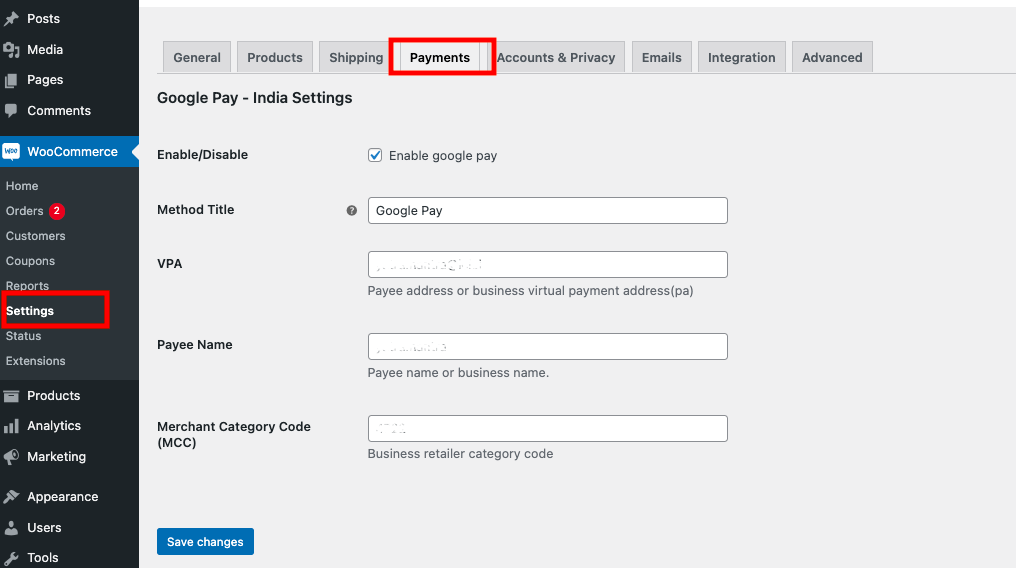
- Go to WooCommerce Settings
- Select Payment Tab
- Click on the “manage” button on the Google Pay option
- Click Enable to activate the plugin
- Fill other information like VPA, Payee Name, and Merchant Category Code from the business console.
- Save Changes.


*Note: We would like to improve this GPay India for Woocommerce plugin, but we need your help. Feel free to tell us your expectations, suggestions and the features you like to see in this plugin. We will consider, seriously!

Chikkili – Google Pay For WooCommerce